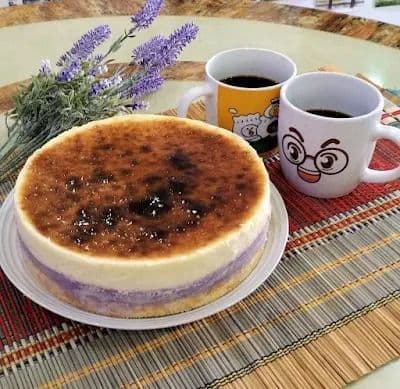
Look at these 3 layers with caramelized and burnt exterior top!! If you are a fan of taro paste and cheesecake. This cake is sweet but not greasy, creamy, and rich in cheese, taro paste plus sponge cake as a base. You can enjoy 3 layers of flavour in one cake at once.
Chefadora AI has the answer - timers, swaps, step-by-step help.
3 Add the whipping cream, lemon juice, and lemon zest and beat until incorporated.
How do I store leftover Taro burnt cheesecake?
To store leftover Taro burnt cheesecake, cover it tightly with plastic wrap or place it in an airtight container. It can be kept in the refrigerator for up to 5 days. For longer storage, you can freeze individual slices for up to 3 months. Just make sure to wrap them well to prevent freezer burn.
Can I make Taro burnt cheesecake gluten-free?
Yes, you can make Taro burnt cheesecake gluten-free by substituting the plain flour with a gluten-free flour blend. Make sure to check that all other ingredients, like the baking powder, are also gluten-free to ensure the entire cake is suitable for those with gluten sensitivities.
What can I use as a substitute for taro in the Taro burnt cheesecake recipe?
If you can't find taro, you can substitute it with purple sweet potato or even pumpkin puree for a different flavor profile. Keep in mind that the texture and taste will vary slightly, but it will still yield a delicious cheesecake.
What flavors pair well with Taro burnt cheesecake?
Taro burnt cheesecake pairs wonderfully with flavors like coconut, vanilla, or even a hint of citrus from lemon or orange zest. You can also serve it with a side of fresh fruit, such as berries, to add a refreshing contrast to the rich cheesecake.
How long should I let Taro burnt cheesecake cool before serving?
After baking, let the Taro burnt cheesecake cool in the oven with the door ajar for about 30 minutes to prevent cracking. Then, refrigerate it for at least 6 hours, preferably overnight, to allow the flavors to meld and the texture to set properly before serving.
I loved to cook and enjoyed learning about all sort of cuisines. Today, I am still in the kitchen and every chance I get, I cook. Some days it isn’t even fancy or a hard recipe. Some days it’s a classic, but something that I’ve created. Cooking is my time to be me.
...