We use cookies on this website to ensure its proper functioning and to improve the quality of our services. Cookie Policy
Tags and nutritional info are auto-generated and may be inaccurate. Always check the full ingredient list before cooking.
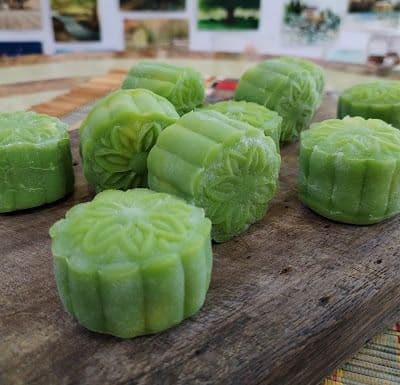
Delicious and fragrant mooncakes with a pandan-flavored snowy skin and a rich coconut filling.
Chefadora AI has the answer - timers, swaps, step-by-step help.
Combine the pandan leaves and water. Blend until a fine pulp. Squeeze the pandan pulp and sieve out the pandan juice.
Combine the glutinous rice flour, rice flour, wheat starch, and icing sugar in a large bowl and whisk together to combine.
Add the pandan juice, coconut cream, condensed milk, and cooking oil to the flour mixture. Stir to combine. Strain the mixture into a greased and heatproof plate.
In a wok, cook on high heat until the water boils. Place the plate on a steamer rack in a steamer and switch to medium-high heat. Steam for 15 minutes until the mixture is solid. Poke the middle to check doneness; no runny raw dough should be visible.
Scrape off the dough while it is still hot, or it will be sticky. Transfer to a silicon mat and knead for 10 to 15 minutes until the dough becomes shiny, smooth, and stretchy. Wear disposable gloves during the kneading process to avoid the dough sticking to your hands.
Wrap the dough in plastic wrap and chill for at least 1 hour or until fully cool.
Combine wheat starch, sugar, and salt in a large bowl. Mix well.
Add the coconut cream, egg, desiccated coconut, and melted butter. Stir until well combined.
Pour into a skillet and cook on medium-low heat. Stir continuously to prevent lumps until the mixture thickens and comes together. The mixture should not stick to the spatula.
Wrap the filling in plastic wrap and chill in the fridge.
Put glutinous rice flour in a skillet and cook on medium heat, stirring with a wooden spoon, until it starts to turn golden brown and smells fragrant. Remove and let cool for coating later.
Take the filling out of the refrigerator. Divide it into 10 portions and shape it into small balls.
Take the skin dough out of the refrigerator. Divide it into 10 portions and roll into balls.
Flatten the skin dough, place the filling in the center, and wrap the dough around it. Roll it lightly between your palms to seal the dough and ensure it’s evenly wrapped around the filling.
Dust a mooncake mould lightly with toasted glutinous rice flour.
Fit the mooncake seam side down into the mould and press gently. Place the mould on the work surface and hold it in place, pressing down firmly to stamp the mooncake top. Gently press the mooncake out of the mould.
Place in an airtight container lined with baking paper and refrigerate for 2 hours. Snow skin mooncakes are typically served cold. If they seem firm, you can let them sit for 10-15 minutes at room temperature first.
Remember to wear disposable gloves during the kneading process to avoid the dough sticking to your hands.
How do I make the pandan juice for the Pandan Coconut Snowy Mooncakes?
To make pandan juice, blend 10g of pandan leaves with 110ml of water until you get a fine pulp. Then, squeeze the pulp and sieve it to extract the juice. This fragrant juice is essential for the mooncake skin.
Can I substitute glutinous rice flour with regular flour in this mooncake recipe?
No, glutinous rice flour is crucial for the texture of snowy mooncakes. Regular flour won't provide the same chewy consistency. If you're looking for gluten-free options, stick with glutinous rice flour as it is naturally gluten-free.
What is the best way to store leftover Pandan Coconut Snowy Mooncakes?
Store the mooncakes in an airtight container lined with baking paper in the refrigerator. They can last for about 3-5 days. For longer storage, consider freezing them, but allow them to thaw in the fridge before serving.
What can I pair with Pandan Coconut Snowy Mooncakes for a dessert platter?
These mooncakes pair wonderfully with a cup of jasmine tea or coconut milk. You can also serve them alongside fresh fruits like mango or lychee for a refreshing contrast.
How long do I need to chill the mooncake dough before shaping?
After kneading the dough, wrap it in plastic wrap and chill it in the refrigerator for at least 1 hour or until fully cool. This helps the dough firm up, making it easier to shape and work with.
I loved to cook and enjoyed learning about all sort of cuisines. Today, I am still in the kitchen and every chance I get, I cook. Some days it isn’t even fancy or a hard recipe. Some days it’s a classic, but something that I’ve created. Cooking is my time to be me.
...